What is confirmed
- The store page says: “Every turret has two builds that change how it fights.”
- The points you earn are spent on “over 170 upgrades: unlock new turrets and abilities, make them stronger, and pick a build for each one.”
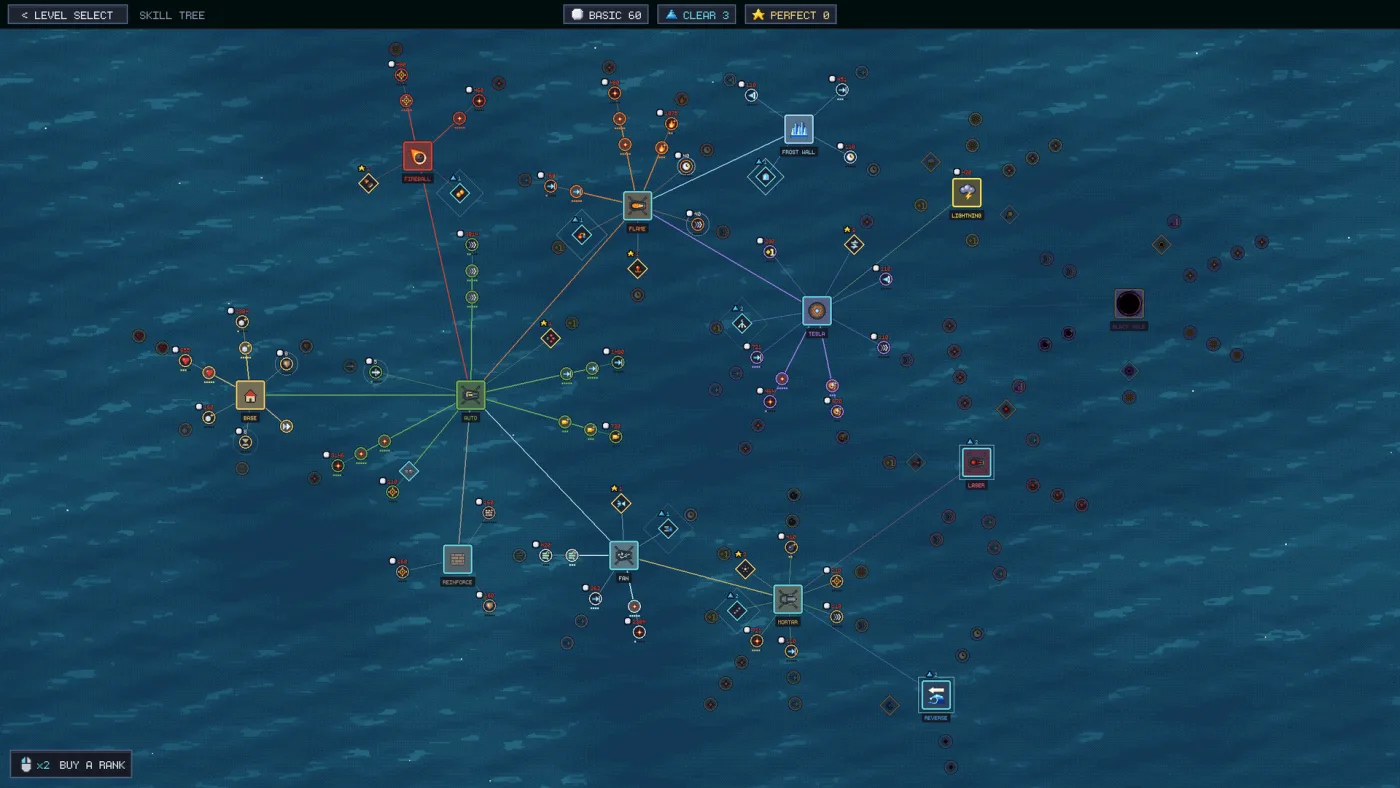
- The trailer’s skill tree shows diamond-shaped nodes branching off turret nodes, with Perfect (gold star) costs on some of them.
- The same tree shows ordinary circular nodes costing Basic (white) points, and turret/ability unlocks costing Clear (blue) points.
That is the whole confirmed system. There is no published build name, description or stat for any turret.
What a build choice probably changes
This is inference from the turret roles and the two-build promise, not store copy. Treat it as a list of questions to answer in the demo:
| Turret | The trade a second build usually makes | What to test |
|---|---|---|
| Auto | Single-target vs spread/shotgun | Does one build hit a line of drops instead of one? |
| Flame | Wider cone vs longer burn | Does one build cover more bank but kill slower? |
| Tesla | More chains vs harder hits | Does one build jump to more drops? |
| Laser | Longer beam vs faster fire | Does one build pierce further or cycle faster? |
| Fan | Stronger push vs wider push | Does one build hold a surge better? |
| Mortar | Bigger splash vs harder impact | Which clears a packed clump faster? |
| Black Hole | Longer hold vs larger radius | Does it delete a surge or just stall it? |
The demo discussions mention a “shotgun” and a “cannon” without saying which turret they belong to. We deliberately do not map those words to builds: a wrong mapping is worse than an admitted gap.
How to choose a build
Ask four questions about the map, not about the turret:
- Is the flood arriving in clumps or a thin stream? Clumps want area (Mortar, Flame, Tesla chains). A thin stream wants single-target efficiency (Laser, Auto).
- Is the kill zone a straight or a bend? A long straight multiplies piercing builds. A bend multiplies splash.
- Is the bank eroding? If the position has a short life, invest in a build that pays off immediately, not one that scales over a long wave.
- Is the turret protecting something? A Fan or Frost Wall build that buys time can be worth more than damage if the alternative is losing the kill zone.
A simple rule for a new player: one damage build per turret type, one control build for the map’s problem. Do not build two of the same role and then wonder why the flood walks around it.
How to test builds in the demo
The demo is free, and it uses the same skill-tree structure. A clean test:
- Pick one turret you already like (Flame is the easiest to feel).
- Play the same level twice with the same placement and the same other turrets.
- Buy build A in run one and build B in run two.
- Compare where the flood breaks through, not just the damage number. A build that kills slower but holds the bank can be better.
- Write down the cost of each build in Perfect points. If the demo’s economy is tight, that cost is the real decision.
Do not test builds on the hardest challenge level first: too many variables. Use a level you can already clear.
What we do not know
- The name of any build.
- The exact effect of any build.
- Whether a build can be swapped or refunded.
- Whether both builds can be active at once (the store’s wording implies one per turret).
- Whether the launch build changes the system.
The launch is November 13, 2026. We will update this page from the release build and the patch notes; until then, the demo is the only honest source.